Miseducated | Behind-The-Scenes
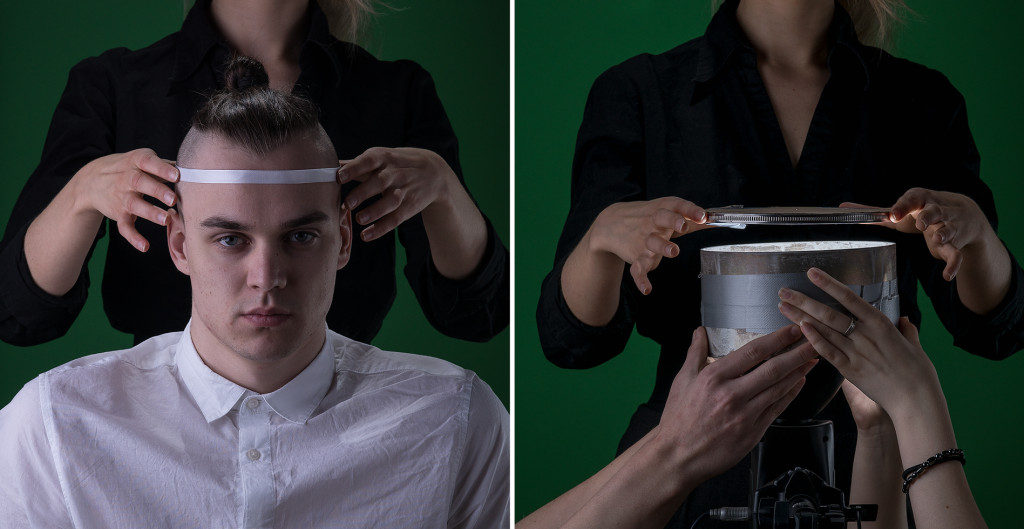
“In the background you can see a bookself. There is a person sitting infront of the camera, representing a student. Behind him there is another person, who is lifting the top part of his head up, seperating it from the lower part. This is representing the education system. From the inside we can see a glow. His ideas and mind are getting stolen.“ – This was the concept.
I can’t exactly recall when or how I got the idea for this picture, but what I do remember, is the original concept and vision. What I visualized was a person sleeping, lying on his side, facing the camera as a thief was stealing his ideas through a USB cable plugged into the side of his head. That idea quickly developed into what it is now.
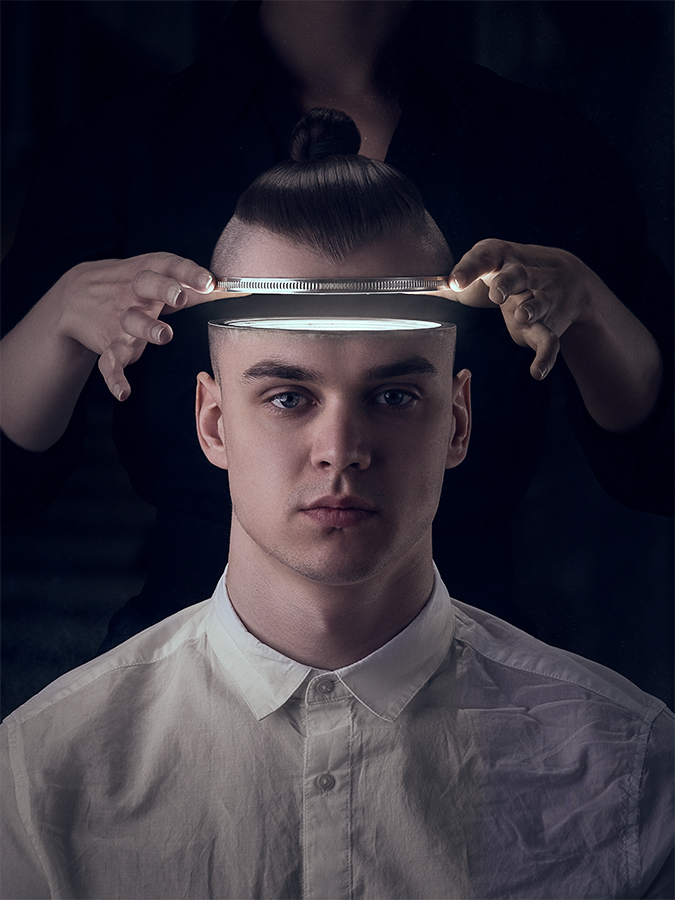
The final image
Upon my first attempt at creating this image. I horribly failed at it, due to the lack of skill, planning and the fact that I had to shoot it completely alone. Because of this, the base material was terrible and the image came out horrible. After this failure, I put the idea on the shelf to wait to be remade in the future.
I had completely forgotten this concept, when one day I stumbled across it while organizing files in my computer. From that moment I set myself a goal: that I would take a second attempt at creating this image. However, that thought quickly faded into the background and other projects became more important and relavent. Some weeks later, I finally decided to pick it back up and started planning it.
The biggest mistake I made while shooting this image for the first time, was that I did it alone. Where as this image required a minimum of three people. One person sitting, the second one acting as the thief and the third person behind the camera, pressing the button and making sure that everything is where it should be.
The second mistake was that I did not collect enough good raw material and trying to make too many details in photoshop. This resulted in the image having almost no fine details and it ended up looking horribly fake. As Christopher Nolan once said: “However sophisticated your computer-generated imagery is, if it’s been created from no physical elements and you haven’t shot anything, it’s going to feel like animation.” This quote may have been for motion pictures, but it also holds true for still images.
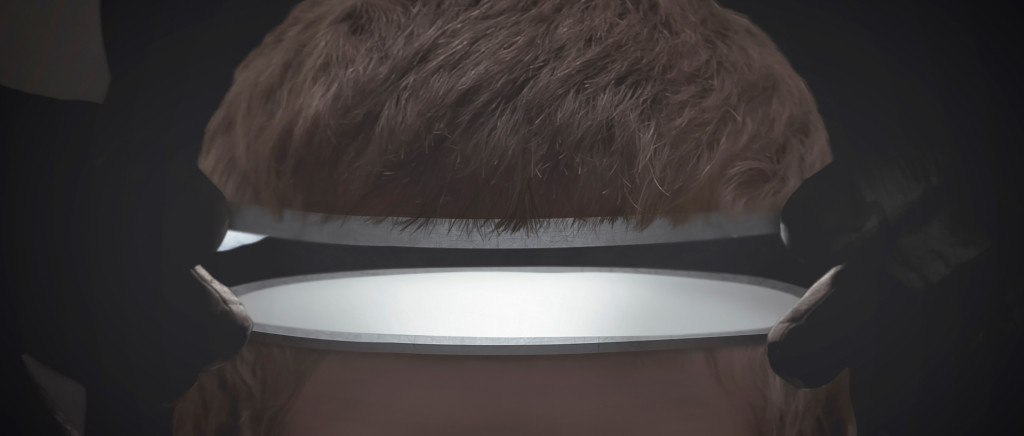
This is a crop of my first attempt.
I didn’t want to repeat any of those mistakes during the second time. I started off by finding two models, a male and female. Then I also made sure I had plenty of help on the shoot. So, I asked three of my friends to come and assist me, one of them filmed the behind-the-scenes video. Once I had the models, their wardrobe was set and my assistants were ready, it was time to figure out how to make the seperation of his head.
My mother makes cakes for a living, she’s a confectioner, and thank god for that. I had no idea of what to use for the inside of his head. When one day I was walking arond the kitchen and noticed these cake pans, they were perfect. I duct-taped them together and that made up the interior of his head. However, in the final image I ended up replacing them with two M42 adapters stacked on top of each other with duct tape. Since I wanted it to have some threads, a logical connection point (sort of).
The top of his head I had almost figured out the first time. What I did, was calculated the diameter of my head and made a circle of the same size out of cardboard, but that was not enough. From my grandfathers garage I stole one clamp and taped that with some electrical tape, to keep it from having light leaks, and duct tape to the cardboard circle. Sometimes I seriously feel like all of my images are kept together by duct tape.
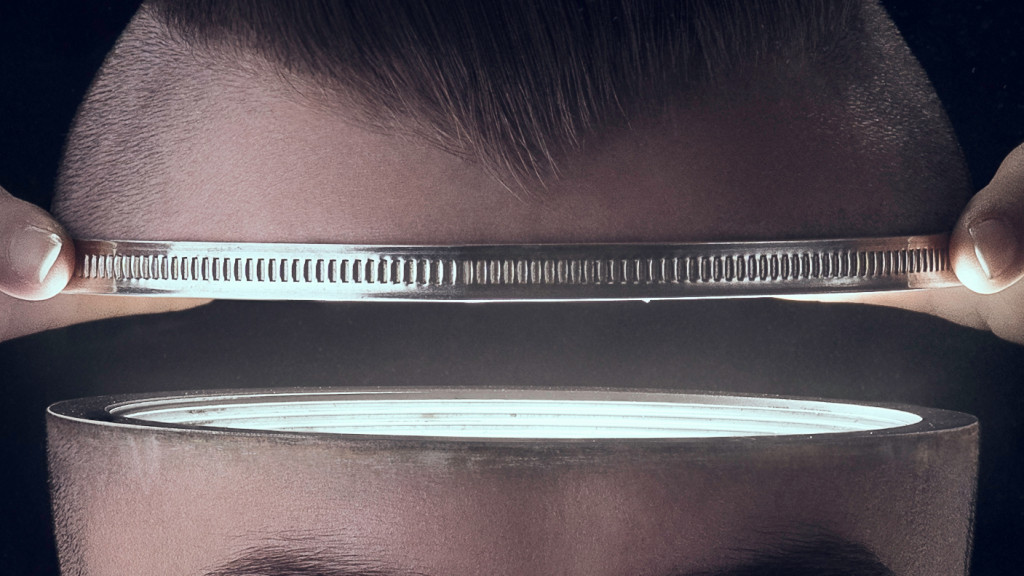
A crop of the second attempt
Now, that I had the construction of the head figured out, it was time to get to the shooting. We booked the assembly hall of our school for the shoot. What made the shoot very nerve racking was the fact that we had three hours to finish the shoot and different people finished school at different times, which meant that they would also arrive at different times.
We arrived on-location with our gear and started setting up. I decided to use a green screen to give a nice contrast between the subjects and the background. Using a white or black background would have been out of the question due to the fact that one of the models was wearing white and the other black clothing.
In the beginning I wanted to go with a very basic lighting setup, a very flat type of light. However, a couple of days before the shoot I came up with a new, more interesting, setup and decided to go with it. I had a 120 cm octabox was the key light, which was on the camera left. On the opposite side there was a silver reflector filling the shadows. To the camera right, behind the subjects, there was a gridded 70×70 softbox giving them a rim light and finally there was a speedlite boomed above the male model giving him a hair light. Natural light of the room affected the exposure a bit aswell.
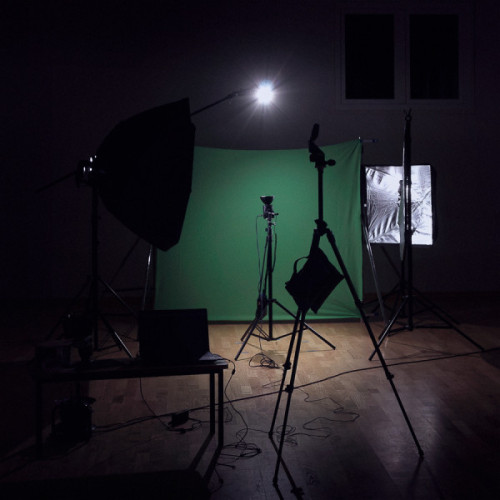
The setup we used
The setup took far longer than expected, it took us two hours and by the end of it the female model had still not arrived, which got me a bit worried. Before the shoot I had told my girlfriend to dress accordingly. So that if needed, she could take the female models place. Thankfully, that did not happen and the model arrived. Then it took us about 30 minutes to get organized and ready for shooting, that meant we were left half an hour for shooting, which was far less then what I planned for in the beginning. One thing that made it even more nerve racking was the fact that the female model had to leave early.
Once we got started with the shooting process, everything went smoothly. We went through my shot list very quickly, nailing every shot and then… We got to shooting the elements for the interior of the head… Everything went smoothly, but it was quite tidious. To simulate the light coming from the inside of the head, I placed a strobe in the middle of the cake pans. Since I didn’t have anything to mount the inside of the head to, I made two of my assistsnts hold it up. Now, it seems easy, but for them to not affect the lighting of the shot, they had to be in a very uncomfortable position… Which probobly made them hate me. During the whole time we were shooting these elements, I hurd them screaming and swearing at me, threatening to kill me. It was quite… hilarious. We finished shooting the images right on time.
During the shoot I made a quick test composit to make sure that all of the elements fit. One of the things that I found out was that all of the head elements were a bit wider than the models head. However, it was very easy to fix it later in Photoshop. What proved that the bigger challenge during compositing was combining the two images of the female model’s hands together. Due to the fact that her hands were at a different angels and at different distances from each other because the head element’s width. After that, everything went smoothly for a while. But then I felt like something was missing from the image, from the bottom part of his head. I felt like it needed some threads. So, as I mentioned before, I stacked two M42 filters on top of each other with some duct tape and placed them into the picture. This added more detail to the lower part of the head, making it look more realistic and also added more debth to the image.
The core images of the head seperation.
The background… Orginally, I wanted it to be a bookshelf that had similar books on it. But finding a bookshelf like that proved to be quite a challenge. One day I had to go to the Estonian National Library for a lecture. Sadly, I wasn’t able to bring my camera, but I had my new Sony Z3 with me, which has a 20,7 megapixel camera and decent enough quality. So, after the lecture concluded, I went ahead and walked around the liblary, trying to find a background for the image. Even though I was in a massive library, I still couldn’t find a bookshelf that fit my liking. In the end, I found this staircase and took a picture of it. When zoomed in, blurred and with some contrast and colour adjustments, this background fits the image perfectly and nobody will ever know, that the background was shot with a smartphone.
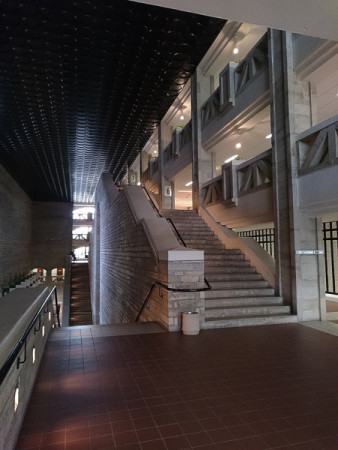
The orginal background image. Shot with the Sony Xperia Z3 Smartphone
This image is made of 342 layers and took two months to finish it (from pre-production to exporting the file at Photoshop). My four year old laptop was really struggling with this image. At times I found myself waiting hours for it to apply a filter or merge a couple of layers together. There were moments when I felt like it is impossible to finish this image. But here I am. With a finished image.
Overall, I think I did a great job with the organizing and making of this composit. I managed to pull off an image that looks realistic and believable and I had lots of fun making it, if we don’t take into count the hours of headace that my laptop created… There are some things that I would do differently or add to the image if I was to remake it in the future, but no image is ever complete or perfect. I would also like to thank my good friend Meel Paliale for the great job he did with the behind-the-scenes video.
[retweet] [facebook]
behind-the-scenes, composite, compositing, how, how we made it, how-to, it, made, miseducated